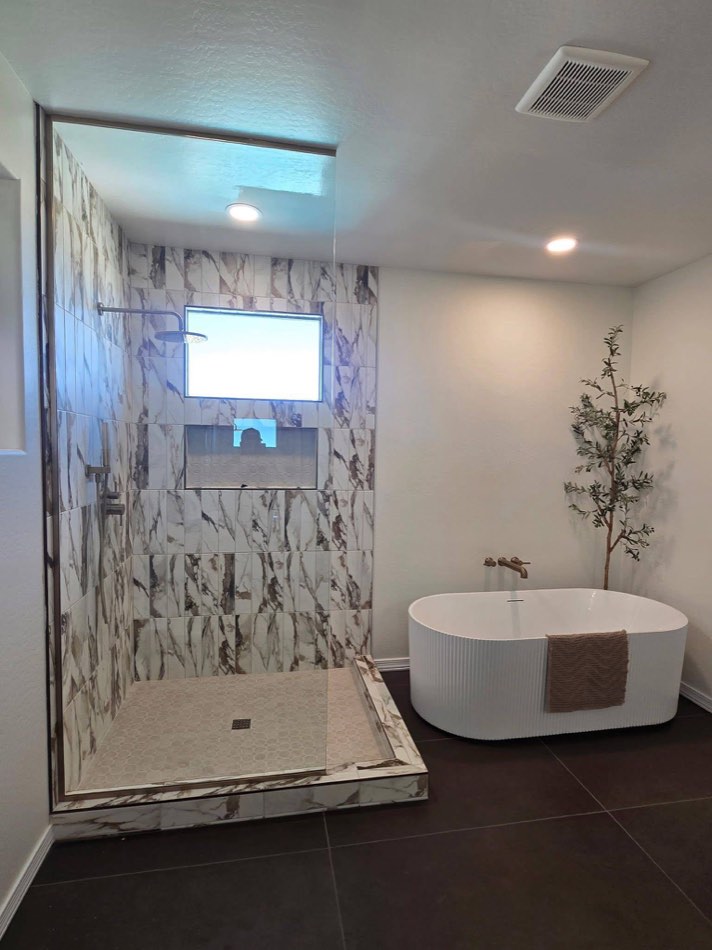
A bathroom remodel is the highest-stress room renovation most Lowcountry homeowners go through, and it's the one where the most expensive mistakes hide behind the walls.
It's also the renovation where small choices — tile substrate, shower waterproofing, ventilation, fixture placement — decide whether you have a bathroom that lasts 25 years or one that's leaking inside the wall by year 7.
This is the contractor-side guide to remodeling a Bluffton SC, Hilton Head, or Savannah bathroom. What to ask, what to insist on, and where you can and can't save money.
The most important parts of a Lowcountry bathroom remodel are the parts you never see: cement board or Schluter membrane behind the tile, proper shower pan slope to the drain, plumbing pressure-tested before the walls close, and a bath fan vented to the outside (not into the attic). Get those right and the rest is just finish selection.
Three kinds of bathroom remodels
Full gut
Walls open to the studs. Plumbing roughed and pressure-tested. Electrical updated to current code. Substrate replaced. Tile, vanity, fixtures, everything new. Walk in to a completely different bathroom.
Tub-to-shower conversion
Pull the existing tub, frame in a curbless or low-curb shower in its place, waterproof the shower pan, tile floor-to-ceiling, install a frameless glass door. The most common request we get because most bathrooms in Lowcountry homes built since the 1990s have an under-used tub.
Refresh / cosmetic
Vanity swap, new mirror, fresh paint, new fixtures, maybe new tile on the floor only. Wall tile and shower stays. Fast, lower-cost, and good for getting a tired bathroom to looking current without opening walls.
What goes behind the tile decides everything
This is the section most contractors won't proactively explain because the answer determines whether they bid the job realistically.
Green board (avoid for showers)
Moisture-resistant drywall. Fine for the rest of a bathroom — ceilings, non-shower walls. Not acceptable behind shower tile. If you have a contractor who's installing tile directly onto green board in a shower, walk away. We've torn out 6-year-old "remodeled" showers where the green board behind the tile had completely failed and the studs were soft to the touch.
Cement board (minimum acceptable)
Hardibacker, Durock, or similar. Won't soften when wet. The minimum acceptable substrate behind shower tile. Pair with a vapor barrier between the studs and the cement board, OR a topical waterproofing membrane like RedGard over the cement board face.
Schluter Kerdi (what we recommend)
A bonded waterproofing membrane that goes over standard drywall or cement board. Creates a continuous waterproof envelope behind the tile. Combined with a Schluter Kerdi shower pan, the entire shower becomes essentially a waterproof box that happens to have tile glued to it.
Schluter is more expensive upfront. It's what we install on any shower we want to be confident will not leak in 20 years. For a Lowcountry humidity environment where moisture finds every weak point, it's worth the upgrade.
Shower pan — where DIYs and bad contractors leak
Building a sloped, waterproof shower floor is technically demanding work. Done right, the floor slopes 1/4" per foot toward the drain, the corners are sealed with a fillet of waterproofing, the entire pan is pressure-tested by filling with water before tile goes down, and the drain has a proper clamping ring that locks the membrane in place.
Done wrong, water seeps through tile grout (which is not waterproof, by the way), pools in low spots on a poorly-sloped pan, finds a weak corner, and slowly destroys the subfloor over years. By the time you see a wet spot on a ceiling below, the joists are already rotted.
Insist on either: (1) a Schluter Kerdi pre-formed pan, or (2) a traditional mud pan with a vinyl membrane liner, sloped to spec, water-tested before tile.
Before tile goes on the shower pan, fill the pan with water above the curb height, mark the water line, and wait 24 hours. The line shouldn't drop. We do this on every shower we build. If your contractor isn't doing this water test, the shower isn't being built right.
Plumbing — rough in, pressure test, then close
The right sequence on a Lowcountry bathroom remodel:
- Demo down to studs
- Rough-in new water supply lines (PEX is standard; copper if you prefer)
- Rough-in new drain lines with proper venting (Lowcountry humidity makes proper venting more important — trapped sewer gas finds its way back into the house if vents are wrong)
- Pressure-test water supply at 60-80 PSI for a minimum of 30 minutes, no drop
- Inspect drain slope and vent runs with the plumbing inspector before closing walls
- Insulate (sound batt on interior walls is worth it — bathrooms get quieter)
- Drywall, then waterproofing, then tile
If your contractor wants to "save time" by closing walls before the pressure test — that's how slow leaks behind walls happen.
Tile selection — what works in Lowcountry bathrooms
Porcelain (not ceramic)
Porcelain tile is denser, harder, and absorbs essentially zero water. Ceramic is fine on walls but porcelain is what should go on floors and in showers. Most "ceramic" tile sold today at big-box stores is actually rated as porcelain — check the spec sheet for a water absorption rating of <0.5%.
Large-format vs small mosaic
Large-format tile (12x24, 24x48) has fewer grout joints, less maintenance, and reads as more modern. The trade-off: needs a perfectly flat substrate or you get "lippage" where corners stick up. Mosaic tile (1-2" tiles) has more grout but conforms to slight imperfections better and provides better foot traction on shower floors.
Shower floor specifically
Most building codes require a tile with a coefficient of friction (COF) of at least 0.42 for wet floors. Polished marble is beautiful but slippery and will get someone hurt. Honed or matte porcelain, pebble mosaic, or 2x2 mosaic tile gives you grip.
Grout — sealed, not just installed
Standard cement-based grout is porous. Without sealing, it stains, harbors mildew, and gradually erodes from cleaning chemicals. Two paths:
- Cement grout + penetrating sealer: Standard install. Seal it once a year. Cheaper material, ongoing maintenance.
- Epoxy grout: Stain-proof, mildew-resistant, no sealing needed. Harder to install (your contractor needs to know what they're doing). Premium choice for shower floors and any high-moisture grout joints.
We default to cement grout on walls (easier to repair if a tile chips) and epoxy grout on shower floors (where mildew actually wants to grow).
Bath fan venting — the most-skipped step
Every Lowcountry bathroom needs a fan vented to the outside of the house. Not "vented into the attic" (which is code-illegal in most counties and creates a humidity problem in your attic that will fail your roof insulation), not "vented into a soffit" (creates condensation in the soffit). Vented all the way out through a wall or roof vent with a proper backdraft damper.
The fan should be sized to the room: minimum 50 CFM for small bathrooms, 80-110 CFM for primary bathrooms with separate shower. Run a humidity-sensing switch (Lutron makes a good one) that auto-runs the fan when the bathroom hits 65%+ humidity, then shuts off after the room dries out. The right fan and switch combo prevents 90% of bathroom mold problems.
Glass shower doors
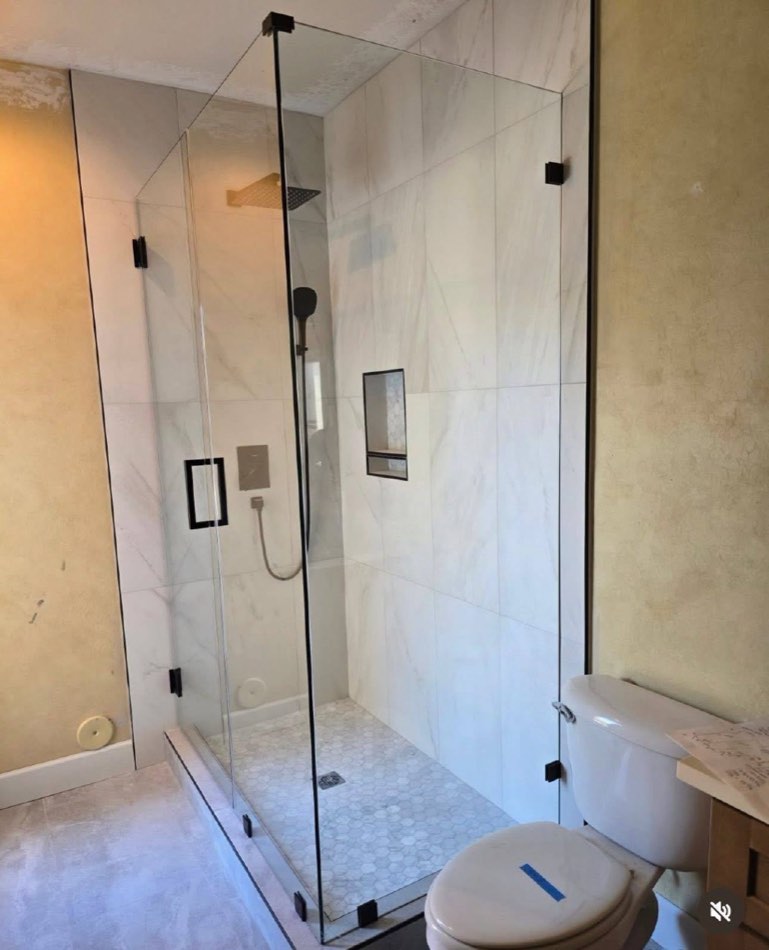
Frameless glass is what most Lowcountry homeowners want and what we recommend. Three things matter:
- Glass should be tempered safety glass, 3/8" or 1/2" thickness
- Hinges and clamps should be solid brass or stainless — cheap chrome-plated zinc will pit and corrode in salt air within a few years
- The shower opening MUST be plumb and square or the glass won't seat properly — this is why we frame the shower opening very carefully and measure for glass AFTER tile is in, not before
Glass takes 2-4 weeks to fabricate and install after measurement, so factor that into your timeline.
Timeline reality check
A full Lowcountry primary bathroom gut remodel typically runs four to seven weeks from demo to final inspection, broken down roughly:
- Week 1: Demo + plumbing/electrical rough-in
- Week 2: Inspections, insulation, drywall, waterproofing
- Week 3-4: Tile install + grout
- Week 5: Vanity, fixtures, mirror, paint
- Week 6: Glass shower door install (after fabrication)
- Week 7: Punch list, final inspection, walkthrough
A tub-to-shower conversion is usually 2-3 weeks. A cosmetic refresh can be done in 1 week.
What we'd insist on for our own bathroom
- Schluter Kerdi waterproofing membrane behind all shower tile
- Schluter Kerdi pre-sloped shower pan, water-tested 24 hours before tile
- Porcelain tile (not ceramic) on floor and shower
- Epoxy grout on shower floor
- Frameless tempered glass door with brass or stainless hardware
- Bath fan vented through the roof, sized to room, on a humidity-sensing switch
- Plumbing pressure-tested for 30 minutes before walls close
- Permitted, inspected, signed off
If you want a real quote for your house, we walk the bathroom, look at what's behind the walls (we can often tell from outside signs — soft spots, paint bubbling, ceiling stains in the room below), and write up a fixed scope with no change orders for stuff we should have caught.